Task scheduling in Linux
Scheduling a job in Linux involves using various tools and methods to automate the execution of tasks at specified times or intervals. Here, I'll provide a step-by-step guide for scheduling a job using the cron utility, which is one of the most commonly used methods for task scheduling in Linux:
-
Open a Terminal: Open a terminal window on your Linux system. You'll use this terminal to create and manage your scheduled job.
-
Edit Your Crontab File: Each user on a Linux system can have their own crontab file to schedule jobs. To edit your crontab file, use the following command:
crontab -eIf you're scheduling jobs as the root user or with superuser privileges, you can use
sudo:sudo crontab -e -
Add a Job Entry: In the text editor that opens (usually
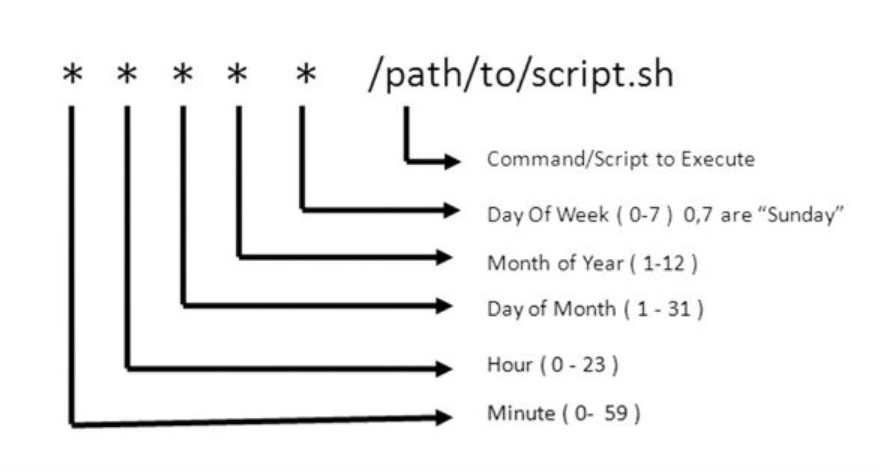
viornano), add a new line for your scheduled job. The general format of a crontab entry is as follows:* * * * * command_to_execute- The five asterisks represent the time and date when the job should run, in the order: minute (0-59), hour (0-23), day of the month (1-31), month (1-12), and day of the week (0-7, where both 0 and 7 represent Sunday).
command_to_executeis the actual command or script you want to run.
Example: To schedule a job to run a script called
my_script.shevery day at 3:30 PM, you would add the following line to your crontab:30 15 * * * /path/to/my_script.sh -
Save and Exit: Save your crontab file and exit the text editor.
- In
vi, you can pressEsc, then type:wqand press Enter. - In
nano, you can press Ctrl+O to write the file, then Ctrl+X to exit.
- In
-
Verify Your Crontab: You can list your current crontab entries to verify that your job is scheduled correctly:
crontab -l -
Monitor the Job: Your job is now scheduled. It will run at the specified times according to the schedule you set. You can monitor the output of your job by checking log files or any other output mechanisms you have set up in your script or command.
That's it! Your job is scheduled and will execute at the specified times. Make sure that the path to your script or command is correct, and the script has the necessary executable permissions. Additionally, be cautious when scheduling jobs as the root user, as they can have significant system-wide effects.
